Introduction
Deploying Tungsten Connector alongside HAProxy provides a robust high-availability (HA) entry point for database clusters, enabling intelligent routing to the appropriate datasources within the cluster.
Depending on your application’s requirements, multiple deployment architectures are available to optimize performance, scalability, and resilience.
In this blog post, we’ll explore two key areas:
- Deployment architectures for the Tungsten Connector layer
- HAProxy layer designs and configuration strategies
Typical Connector Deployment
The Connector intelligent proxy is typically deployed directly onto the application client host, so there would be a Connector Java process running on the application node, and the application would be configured to talk to the proxy via 127.0.0.1:3306. With this setup, no external HA for the proxy layer is needed because the application communicates directly with the on-board Connector process. If the application client process or host dies, then whatever is providing traffic routing at the layer above should mark that application node as offline, providing proper availability for the application layer.
Connector Count Limit
The above on-board design works very very well due to the simplicity and ease of management.
There is, however, an inherent limit to the quantity of Connectors that can run per cluster due to the signalling needs between the Managers and Connectors during switches and failovers. If there are too many Connectors, the operations bog down. Depending on the database server size and the Connector host size, the typical maximum is 30 Connectors per cluster.
This limit impacts the architecture. For example, if there are hundreds of microservices clients facing a Tungsten Cluster, then unfortunately there cannot be one sidecar Connector per application node.
Connector Farming with HAProxy
Instead, a Connector farm is used — a set of two or more hosts each running the Connector proxy, with requests from the application nodes directed to one of the available Connectors.
Since the Connector only provides HA for the database layer, a way must be found to keep the proxy layer available, and also allow the proxy farm to scale as the need arises.
This load-balancing for the proxy layer may come from either hardware or software load balancers, like the Big-IP from F5 Networks, yet not everyone wants that type of solution.
This is where HAProxy comes in. This blog post will discuss two ways of deploying this stable and mature software load-balancer — on-board the application nodes and with an HAProxy farm layer.
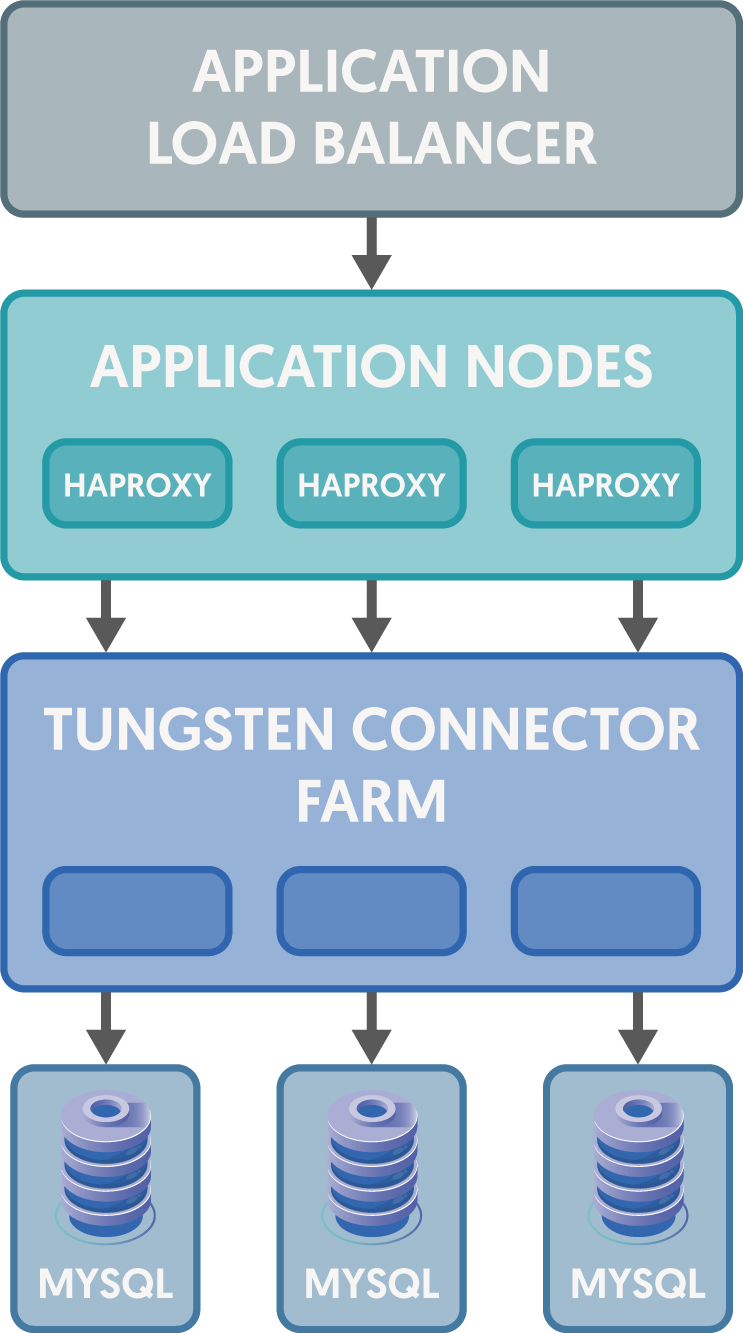
Solution One: HAProxy on the Application Servers
When HAProxy is deployed onto the application nodes, there would be an HAProxy process running locally configured to use all available Connectors in a round-robin fashion, and again the application would be configured to talk to the proxy (HAProxy instead of the Connector) via 127.0.0.1:3306. This time the HAProxy process would find an available Connector and send the MySQL request to the Connector database proxy layer.
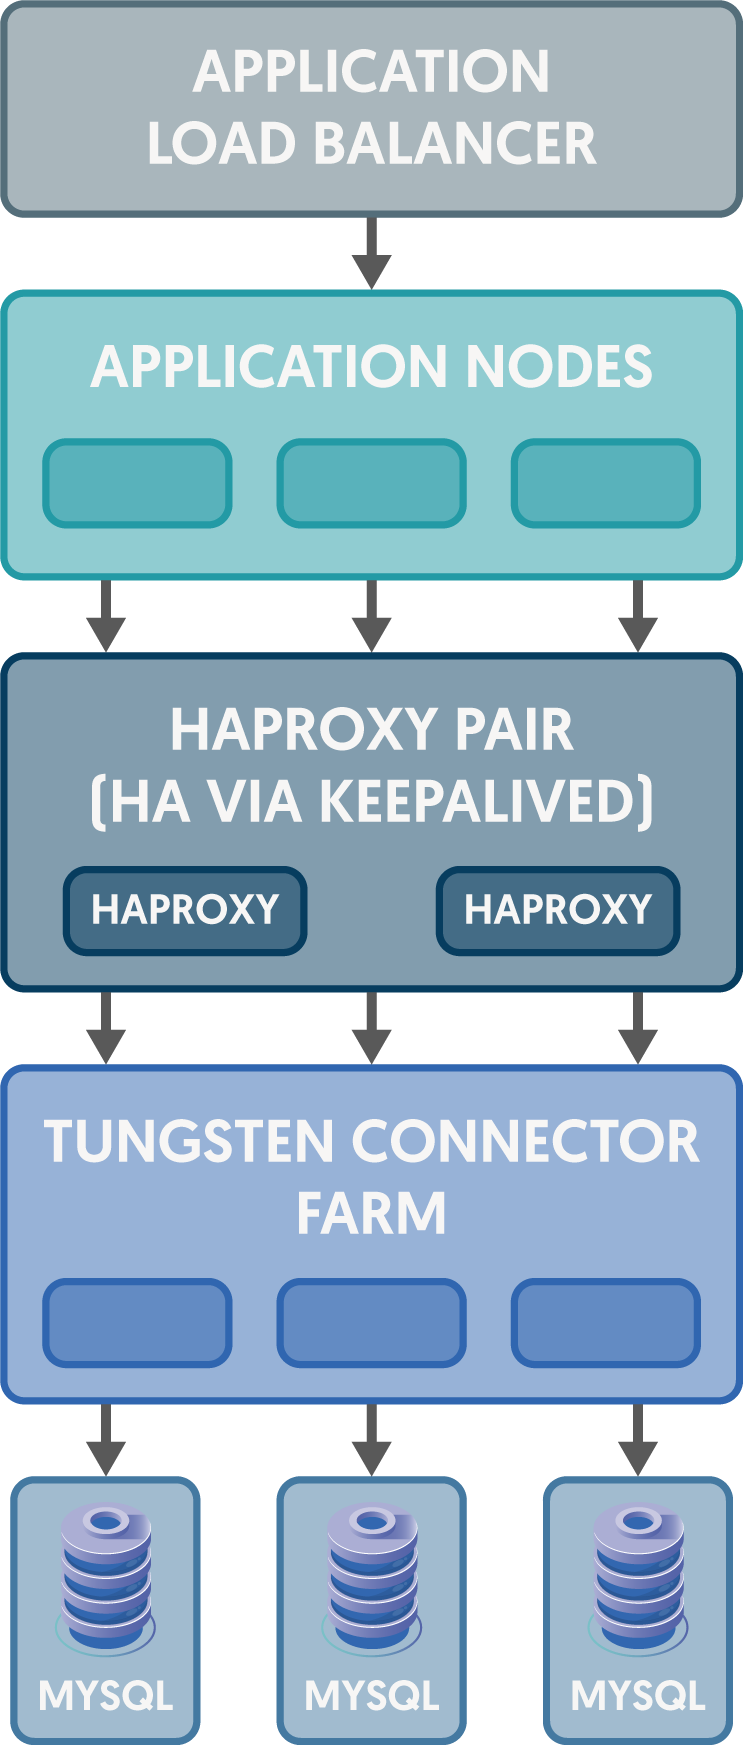
Solution Two: HAProxy Layer
In this scenario, two nodes both running HAProxy configured the same way share an IP address. The HA pair is created using failover software like Keepalived or Pacemaker/Corosync. In either case, the shared IP address moves between the pair of hosts, one Primary and one Backup. If the Primary fails the configured health check, the Backup takes over the IP address and proxy service continues to be available.
Keepalived Failover VRRP Pair Example
First, install the needed packages:
# both nodes
sudo dnf -y install keepalived socat     # or apt install keepalived socat
sudo vi /etc/keepalived/keepalived.conf
Next, configure Keepalived via /etc/keepalived/keepalived.conf:
##############################################################################
# keepalived.conf – VRRP fail-over for HAProxy with dual health-checks
##############################################################################
global_defs {
    router_id HAPROXY_NODE1        # give each node its own string
    vrrp_version 3                 # v2 also OK; v3 supports IPv4+IPv6
}
##############################################################################
# Script-based health-check: ask HAProxy’s stats socket for “show info”
# Exit 0 on success; any non-zero exit lowers priority by 20.
##############################################################################
vrrp_script chk_haproxy_stats {
    script "/usr/local/bin/chk_haproxy_stats.sh"
    interval 2                     # run every 2 s
    timeout 2                      # fail after 2 s if no reply
    weight -20                     # subtract 20 points on failure
    fall 2                         # need 2 bad runs to mark down
    rise 1                         # a single good run clears failure
}
##############################################################################
# VRRP instance: owns the virtual IP
##############################################################################
vrrp_instance VI_1 {
    state MASTER                   # set BACKUP on the other node
    interface ens33                # <-- your NIC here
    virtual_router_id 51           # 0–255; must match on both nodes
    priority 150                   # use 100 on the BACKUP node
    advert_int 1                   # advert every second
    virtual_ipaddress {
        192.0.2.100/24 dev ens33   # <-- your virtual IP and mask
    }
    # Fail if HAProxy dies
    track_process {
        haproxy weight -30         # subtract 30 if process isn’t running
    }
    # Fail if stats socket check fails
    track_script {
        chk_haproxy_stats
    }
}
Create the /usr/local/bin/chk_haproxy_stats.sh script:
#!/bin/bash
# Simple health probe for HAProxy’s stats socket.
# !!! Adjust the socket path if yours differs. !!!
SOCKET="/var/lib/haproxy/stats"
echo "show info" | \
  socat -T1 stdio "${SOCKET}" 2>/dev/null | \
  grep -q "^Name: HAProxy" || exit 1
exit 0
Make the script executable and restart keepalived:
sudo chmod 755 /usr/local/bin/chk_haproxy_stats.sh
sudo systemctl restart keepalived
How It Works
- If the HAProxy process vanishes, Keepalived removes 30 points from the node’s priority; if that drops it below the peer’s priority, the peer becomes MASTER and inherits the VIP.
- If the stats socket probe fails twice in a row (HAProxy hung, mis-configured, or refusing traffic), 20 more points are subtracted, with the same fail-over effect.
- Both nodes keep HAProxy running at all times, so when one regains health its stats check will succeed, its priority will restore automatically, and (because it still has the higher base priority) it will reclaim the VIP.
You can test by stopping HAProxy (systemctl stop haproxy) or by killing its stats socket on the active node and watching the VIP shift to the standby within a couple of seconds.
With the HAProxy failover pair built, let's dive into configuring HAProxy to route MySQL queries to the Tungsten Connector hosts.
Getting Started with HAProxy
To begin, let’s examine an /etc/haproxy/haproxy.cfg designed for use with the Tungsten Connector.
Whether you install HAProxy directly on the application nodes or on an HA pair, the configuration is the same. Below is a sample /etc/haproxy/haproxy.cfg file with the native basic check enabled.
This example is for three connectors, which happen to be installed directly on the database servers, simulating the Connector farm architecture:
#---------------------------------------------------------------------
# 6-Node Composite-Cluster Configuration
#---------------------------------------------------------------------
global
  log         127.0.0.1 local2
  chroot      /var/lib/haproxy
  pidfile     /var/run/haproxy.pid
  maxconn     4000
  user        haproxy
  group       haproxy
  daemon
  # "show stat" | sudo nc -U /var/lib/haproxy/stats
  stats socket /var/lib/haproxy/stats
defaults
  mode          tcp
  option        tcpka
  option        dontlognull
  option        redispatch
  retries       3
  timeout queue   1m
  timeout connect 10s
  timeout client  1m
  timeout server  1m
  timeout check   10s
frontend connector *:3306
    default_backend cluster
backend cluster
    balance roundrobin
    option tcplog
    # default-server port 9200   # uncomment if using external script
    server conn1 db1:3306 check inter 5s rise 1 fall 1 weight 6 maxconn 5000
    server conn2 db2:3306 check inter 5s rise 1 fall 1 weight 6 maxconn 5000
    server conn3 db3:3306 check inter 5s rise 1 fall 1 weight 6 maxconn 5000
To use the external script method of health-checking the database, uncomment the #default-server port 9200 line and restart the haproxy service.
Let me Count the Ways — HAProxy Methods for Health-Checking
There are three ways to monitor MySQL health in HAProxy — two are recommended and one is not (mysql-check, which floods Connector logs with failures):
-
check(native TCP check)
✅ RECOMMENDED
Addcheckto everyserverline so HAProxy opens a TCP handshake on a schedule. Success marks the node “up”; failure marks it “down”. Without it, HAProxy assumes the node is always reachable. -
External check script (via
xinetd)
✅ RECOMMENDED
Runs custom SQL for deep health and consistency checks. -
mysql-check(native MySQL handshake)
❌ NOT RECOMMENDED
Sends a handshake and optional auth packet but cannot verify schema consistency and spams the logs.
Additional detail is in the official HAProxy docs.
The two recommended health-checking methods are illustrated below.
Configuring HAProxy Using the Basic Native Health Check
✅ RECOMMENDED — no MySQL user required.
#---------------------------------------------------------------------
# backend
#---------------------------------------------------------------------
listen connector
    bind *:3306
    mode tcp
    option tcpka   # keep-alive on client & server
    balance roundrobin
    server conn1 db1:3306 check inter 5s rise 1 fall 1 weight 3 maxconn 5000
    server conn2 db2:3306 check inter 5s rise 1 fall 1 weight 3 maxconn 5000
    server conn3 db3:3306 check inter 5s rise 1 fall 1 weight 3 maxconn 5000
Configuring HAProxy Using an External Health Check Script
✅ RECOMMENDED
#---------------------------------------------------------------------
# backend
#---------------------------------------------------------------------
listen connector
    bind *:3306
    mode tcp
    option tcpka
    balance roundrobin
    default-server port 9200          # HAProxy will poll /port 9200
    server conn1 db1:3306 check inter 5s rise 1 fall 1 weight 3 maxconn 5000
    server conn2 db2:3306 check inter 5s rise 1 fall 1 weight 3 maxconn 5000
    server conn3 db3:3306 check inter 5s rise 1 fall 1 weight 3 maxconn 5000
Install the script on every Connector host; HAProxy polls each one on port 9200.
Step 1 — Create the MySQL Health-Check User
-- Wildcard host
CREATE USER 'haproxy'@'%' IDENTIFIED WITH mysql_native_password BY 'secret';
GRANT USAGE ON *.* TO 'haproxy'@'%';
-- Bridge mode
CREATE USER 'haproxy'@'{ip_of_application_host}' IDENTIFIED WITH mysql_native_password BY 'secret';
GRANT USAGE ON *.* TO 'haproxy'@'{ip_of_application_host}';
-- Proxy mode
CREATE USER 'haproxy'@'{ip_of_connector_host}' IDENTIFIED WITH mysql_native_password BY 'secret';
GRANT USAGE ON *.* TO 'haproxy'@'{ip_of_connector_host}';
-- SmartScale needs REPLICATION CLIENT
GRANT USAGE, REPLICATION CLIENT ON *.* TO 'haproxy'@'%';
Step 2 — Add Credentials to /opt/continuent/tungsten/tungsten-connector/conf/user.map
haproxy secret cluster_name_here
Step 3 — Deploy /opt/continuent/share/connectorchk.sh
#!/bin/sh
# Return 200 OK when MySQL is healthy, 503 otherwise.
MYSQL_HOST=$(hostname)
MYSQL_PORT=3306
MYSQL_USERNAME=haproxy
MYSQL_PASSWORD=secret
MYSQL_OPTS="-N -q -A test"
FORCE_FAIL=/dev/shm/proxyoff
OUT=""
return_ok() {
  printf 'HTTP/1.1 200 OK\r\nContent-Type: text/plain\r\n\r\nMySQL is running.\r\n'
  exit 0
}
return_fail() {
  printf 'HTTP/1.1 503 Service Unavailable\r\nContent-Type: text/plain\r\n\r\nMySQL is *down*.\r\n%s\r\n' "$OUT"
  exit 1
}
[ -f "$FORCE_FAIL" ] && { OUT="$FORCE_FAIL found"; return_fail; }
mysql $MYSQL_OPTS -h"$MYSQL_HOST" -P"$MYSQL_PORT" -u"$MYSQL_USERNAME" -p"$MYSQL_PASSWORD" \
      -e 'select @@hostname;' 2>&1 || return_fail
return_ok
chown tungsten:tungsten /opt/continuent/share/connectorchk.sh
chmod 700 /opt/continuent/share/connectorchk.sh
chmod +x /opt/continuent/share/connectorchk.shStep 4 — Install xinetd
# RHEL / CentOS
sudo yum -y install xinetd telnet
# Debian / Ubuntu
sudo apt-get install xinetd telnet
Step 5 — Register the Service
echo "connectorchk 9200/tcp" | sudo tee -a /etc/services
Step 6 — Create /etc/xinetd.d/connectorchk as the Root User
service connectorchk
{
  flags          = REUSE
  socket_type    = stream
  port           = 9200
  wait           = no
  user           = tungsten
  server         = /opt/continuent/share/connectorchk.sh
  log_on_failure += USERID
  disable        = no
  # only_from    = 0.0.0.0/0   # tighten as needed
  per_source     = UNLIMITED
}
Step 7 — Restart and Verify
sudo service xinetd restart
telnet localhost 9200
HTTP/1.1 200 OK
Content-Type: text/plain
MySQL is running.Monitoring HAProxy Status
Ensure stats socket is enabled in haproxy.cfg:
global
  stats socket /var/lib/haproxy/stats
  ...
(Restart HAProxy after editing haproxy.cfg.)
Check runtime stats with nc:
echo "show stat" | sudo nc -U /var/lib/haproxy/stats# pxname,svname,qcur,qmax,scur,smax,slim,stot,bin,bout,dreq,dresp,...
connector,FRONTEND,,,0,1,3000,2,1261,4062,0,0,0,,,,,OPEN,...
connector,conn1,0,0,0,1,5000,1,605,1915,...,UP,3,1,...
connector,conn2,0,0,0,1,5000,1,656,2147,...,UP,3,1,...
connector,conn3,0,0,0,0,5000,0,0,0,...,UP,3,1,...
connector,BACKEND,0,0,0,1,300,2,1261,4062,...,UP,18,6,...
You need nc installed, and the command must run with root privileges to access the UNIX socket.
Wrap-Up
Combining Tungsten Connector with HAProxy creates a powerful high-availability solution for database clusters, enabling intelligent routing and seamless failover. Depending on your application’s architecture and performance needs, various deployment strategies can be tailored at both the Connector and HAProxy layers. By understanding the options and configurations available, you can design an HA stack that balances scalability, fault tolerance, and simplicity — ensuring continuous and efficient access to your data.
Smooth Sailing!

Comments
Add new comment